Rear Wheel eBike Conversion in 5 Easy Stages
Part 3 of eBike Conversions For Beginners series
Continuing the series of eBike conversions for beginners, in this DIY guide we will be looking at converting your existing or newly acquired secondhand bike to an electric pedal assist or throttle-only bike using a rear wheel hub motor eBike conversion kit.
Completing an eBike conversion using a rear wheel hub kit can be completed in 5 relatively easy stages.
This is part 3 of eBike Conversions for Beginners. If you are a complete beginner to eBike conversions it is strongly advised that you read or at least skim Part 1 An introduction to eBike conversions as it covers topics such as safety considerations that you need to think about particularly regarding hub wheel motor conversions.
Tools Required
You will need a standard bike toolkit including torx bits for disc brakes, wrenches, spanners, flat and crosshead screwdrivers plus a crankarm extractor and pedal wrench.


Type of Rear Wheel Conversion Kit Required
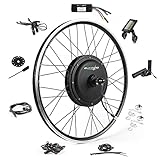


Preparation and installation of hub wheel
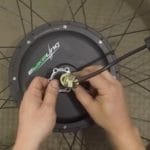
Remove old rear wheel from your bicycle. From old wheel remove inner tube, rim tape, and disc brakes (if you’re going to be reusing)
- Check and if necessary tighten the spokes on your new wheel.
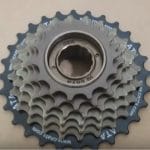
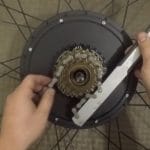
- If freewheel didn’t come attached to the new hub motor, install the freewheel – initially screw it on by hand, then use the chain tool to tighten it up.
- Line the hub wheel with the rim tape – this helps to prevent punctures from the spokes.
- Place the hub wheel into the tire.
- Insert inner tube. TIP If you partially inflate the inner tube – this will prevent pinching when finally fitting the tire over the inner tube and ensures a tight fit.
- Now fit the tire with your tire levers and pump it up.
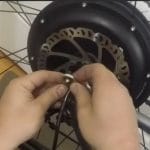
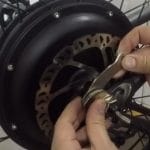
- If the new rear wheel hub motor has provided mounts for a disc brake rotor, remove the six screws and spacer/dummy plate, before screwing your disc brake to the new wheel.
- Use the same screws that were provided in the hub. If you use longer screws you risk damaging the hub motor as they can catch inside the hub.
- TIP From the first screw put in, the next screw should be opposite that screw. Continue like that till all 6 screws are in. This ensures an even fit.
- Assuming your bike is upside-down, make sure the entrance point where the cables protrude from the hub motor are facing upwards to prevent rain etc from entering when on the road.
- Install the rear wheel on to the bike with round washers inside of the frame. Make sure wheel fits evenly within the brake caliper (if using disc brakes)
- CHALLENGE If wheel doesn’t fit properly, you’ll need to file the inside of your dropouts a little bit at a time. The spacing should be 10mm.
- The distance between the forks is generally 135mm. If your distance between the rear forks are too narrow you can gently prise them apart.
- Install the torque arm to prevent the wheel from spinning out of the forks. The torque arm transfers the axle torque up the forks. See video below on how to install a torque arm.
- Fit external washer or the lock washer/mounting nut on the chain side. Initially tighten the nuts by hand.
- Once wheel is running true, and movement on the chain is aligned to your satisfaction, tighten the nuts with wrench/spanner.


Pedal Assist Sensor (PAS) - non-chain side
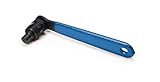
- On the non-chain side of your bike, remove the cap covering the nut, undo the nut either with spanner/wrench or allen key. Take your crank arm extractor and screw it in clockwise and tighten the lower nut (nearest the crank) with a spanner using the crank as leverage. Once it’s firmly in, turn the top nut clockwise holding the crank for leverage – this applies a pulling pressure inside the crank – until the crank arm is pulled off.
See video below for crank removal.

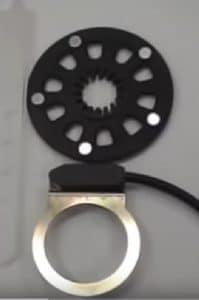
- Once crank is removed, unscrew the outer ring – if you have one – then on the exposed crank shaft slip on the sensor ring and screw the outer ring back on top of it.
- Once the sensor is in place then add the magnetic circular disc with the magnets facing outwards ie away from the bike, with no more than 3mm gap between sensor and rotor.
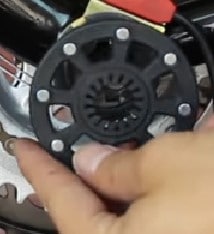
- Put the pedal crank back on – CHALLENGE – some bikes may need to have a washer put on behind the pedal crank to make it snug or may have to file around the opening of the crank arm to get it to fit.
- The cable from the PAS will connect to the PAS cables on the controller
Install the Battery
- Install the battery mount to the existing water bottle mount holes. If you don’t have any you will have to drill holes and fit.
- Fit battery on to the plate.
- See video below for alternative battery fitting.

| # | Preview | Product | Rating | Price | |
|---|---|---|---|---|---|
| 1 |

| H HAILONG 36V 8Ah 288Wh Ebike Battery, Electric Bike Scooter Lithium Battery with Charger,2A Charger... | 165 Reviews |
$109.99 | Buy on Amazon |
| 2 |

| Unit Pack Power Ebike Battery - 48V Electric Bike Battery for 1000W/750W / 500W Motor Bicycle -... | No ratings yet | $256.00 | Buy on Amazon |
Install the Cockpit / Handlebar Area
- Remove everything from your handlebars
- Install the LCD display, control switch, throttle and e-brake.
- You’ll need to remove the cable/housing from existing brakes and install on to the e-brake levers.
- Put back your gear shifter and grips.ChallengeIf your bike has an all in one shifter and brakes combined – common on mountain bikes – it means you’ll be unable to use included e-brake levers meant for cutting off motor.Please see video below for alternative.

- At this stage we’re going to combine cable management and connectivity.
- Grab all the wires hanging from the components on your handlebars – ie LCD, switch & throttle – cable tie or insert spiral cable “tidy” over them following the frame of the bike toward where your controller will be.
- Do the same thing with the motor cable, battery cable and PAS cable.
- Take both bundles and thread them into the controller bag through the hole in the bottom of your controller bag.
- Doing it this way makes it a bit easier to now connect everything to the corresponding cables on the controller.
- See next section
Install controller and connect the Wires
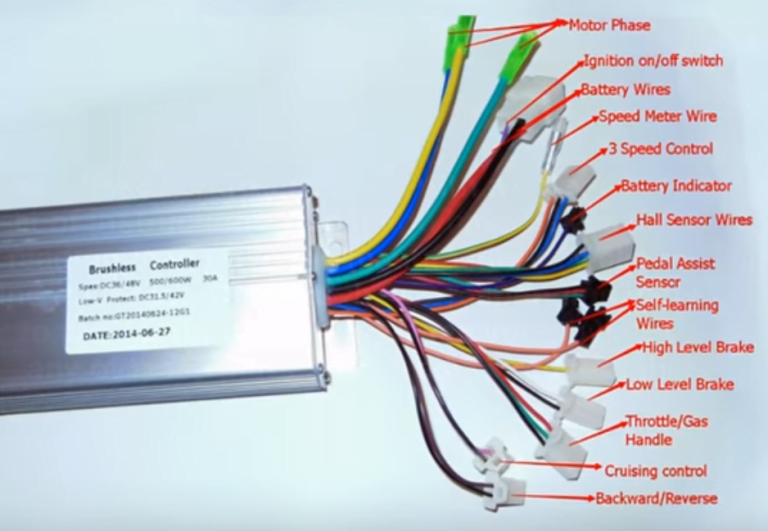
- Battery connector – usually made up of 2 thick wires. One red and one black. Increasingly there is third thinner wire which may also be red or brownish as in the diagram. This is the on/off or ignition switch wire.
- Motor connectors known as three-phase power connectors are yellow, blue and green and tend to have bullet connectors with plastic looking sleeving over them. If after plugging them in, the motor spins backwards swap over the green and yellow wires and it should spin forwards.
- The Hall sensor wires also for the motor with the small boxy connector will usually have 5 thin wires (sometimes 6 wires) – red, black, yellow, green and blue.
- Throttle cables are made up three thin wires – red, green and black. If your throttle has a power button or voltage display there will be a 4th wire possibly yellow which plugs into the positive of the switch system
- Pedal Assist sensor wires are made up three thin wires red, black, blue with small black connector.
Once you’ve finished all your connections, wrap the excess spiralled covered wires around the controller, fit the controller in the bag supplied. Zip up.
If you read Part 1 of this series you should already have an idea of where you’ll place your controller.
Use the zip ties to tie down your bundles along the frame.
Summary
- Prepare the rear wheel hub motor and install
- Install the pedal assist sensor
- Install the battery
- Install the cockpit area
- Connect everything to the controller and do basic cable management
- Check everything works
- Enjoy your new eBike
You can see other step by step guides on converting your bike by clicking on one of the links in the yellow box below – eBike Conversions for Beginners.
eBike Conversions for Beginners series
- Part 1 is an introduction to eBike conversions and covers reasons to convert a regular bicycle to an eBike, types of conversion kits with their pros and cons, safety and legal considerations, planning where to place components and much more
- Part 2 is a step by step guide on converting your bike with a front wheel hub motor kit
- Part 4 is a step by step guide on converting your bike with a mid drive motor kit
- Part 5 covers the 7 best eBike hub conversion kits for heavy and overweight people
You might also be interested in reading Bike Accessories You Didn’t Know You Wanted which includes tips and tools to keep your bike and yourself safe on the roads and having a look at the review on eBike specific helmets for fast eBikes
Related Posts
Seven Must Do Actions Before Buying ANY eBike Conversion Kit
Got an old bike that you want to convert? Learn the 7 Must Do Actions Before Buying ANY eBike Conversion Kit and save time and money with proper preparation
7 Best eBike Conversion Kits for Heavy and Overweight People
Heavy eBike rider? Here’s the 7 best hub and mid drive eBike conversion kits for people weighing 280 pounds plus. eBike Conversions for Beginners Series Part 5
Complete Beginners Guide – eBike Conversion In 6 Easy Steps
Part 2 of eBike Conversions for Beginners – Step by step guide for complete beginners to build an eBike with a front wheel hub motor kit in six easy steps.
6 Simple Steps to Convert A Regular Bike To An eBike
Part 4 of eBike Conversions For Beginners. Step by step guide for intermediate beginners to build an eBike with a mid drive motor kit in six simple steps.
Beginners Guide on How to Convert a Regular Bike to an eBike
Part 1 of eBike Conversions for Beginners series – 5 reasons to convert a normal bike to electric. Differences between wheel hub motor and mid drive kits.
Last update on 2024-04-27 / Affiliate links / Images from Amazon Product Advertising API