Sourcing the Perfect Secondhand Bike for Your eBike Conversion Project
Explanation of the benefits of converting a secondhand bike to an e-bike
Are you looking to join the electric bike revolution without breaking the bank? Converting a secondhand bicycle to an electric bike can be a cost-effective and sustainable way to enjoy the benefits of e-bike riding. Electric bikes offer a convenient, efficient, and eco-friendly means of transportation, making them increasingly popular among commuters and recreational riders alike.
However, buying a new e-bike can be quite expensive, and the available options may not always meet your specific needs or preferences. That’s where converting a secondhand bike comes in. By starting with a quality used bike and adding a motor and battery, you can customize your own e-bike at a fraction of the cost of a brand new one.
Overview of the process of buying and converting a used bike
In this article, we’ll guide you through the process of sourcing, inspecting, and purchasing a secondhand bicycle that’s suitable for conversion to an electric bike.
We’ll cover what to look for in a used bike, how to assess its condition and compatibility with an e-bike conversion kit, and how to negotiate a fair price.
Importance of inspecting a bike before purchase
Before you can start your e-bike conversion project, you’ll need to find a suitable used bike. However, not all secondhand bikes are created equal, and some may not be suitable for conversion or may require significant repairs or modifications. That’s why it’s essential to inspect the bike thoroughly before purchasing it.
In the following sections, we’ll outline the key factors to consider when inspecting a used bike for an e-bike conversion project.
Looking for a Secondhand Bike for Conversion
When searching for a secondhand bike for your electric bike project, there are various options available. In this section, we will discuss where to find used bikes.
Where to Find Used Bikes
Online Marketplaces
One of the most popular places to find used bikes is online marketplaces such as Craigslist, eBay, and Facebook Marketplace. These platforms offer a wide variety of options, and you can often find bikes that are priced below market value.
However, it is essential to exercise caution when buying from these platforms. Be sure to verify the seller’s reputation, and always inspect the bike before making a purchase. Additionally, be wary of deals that seem too good to be true, as they may be scams.
Local Bike Shops
Local bike shops are an excellent option for finding used bikes. Many bike shops take trade-ins or buy used bikes from customers, which they then refurbish and sell.
One of the advantages of buying from a local bike shop is that you can often receive expert advice on the best bike for your needs. Additionally, you can be confident that the bike has been thoroughly inspected and any necessary repairs have been made.
Garage Sales and Flea Markets
Garage sales and flea markets can be a great place to find a bargain. However, it can be hit or miss, and you may need to visit several sales before finding the right bike.
When shopping at a garage sale or flea market, be sure to inspect the bike carefully. Look for signs of wear and tear, and test the brakes and gears. Keep in mind that you may need to invest some time and money in repairs or replacement parts if you choose to buy from these venues.
Factors to Consider When Inspecting a Secondhand Bike for Conversion
When looking for a secondhand bike for conversion, it’s important to choose the right one that fits your needs and budget. Here are some tips to help you choose the perfect bike for your DIY electric bike project:
- Determine your needs: Before starting your search, you need to determine what you need the bike for. Are you planning to use it for commuting or leisurely rides? Do you need a bike with a lot of gears or a more streamlined one?
- Understanding your needs will help you narrow down your search and find a bike that is suitable for your intended use.
- Consider the frame material: The frame material is an important factor to consider when choosing a bike. A steel frame with steel dropouts is the best material for an eBike conversion project simply because of its strength. Aluminum frames are optional but you will probably need one or even two torque arms to add strength to the dropouts. Carbon fiber frames are generally considered too lightweight for an eBike conversion.
- Look for bikes with compatible geometry: The geometry of the bike is an important factor to consider when looking for a secondhand bike for conversion. You’ll want to look for bikes that ideally have a straight top tube and plenty of space in the front triangle for mounting a battery.
- Check the bike’s size and fit: It’s important to choose a bike that fits your body size and shape. Take into consideration your height, inseam, and arm length when looking at bikes. A good fit will not only make your ride more comfortable but also ensure your safety.
- Determine your budget: Determine your budget before starting your search for a secondhand bike. Keep in mind that you’ll need to factor in the cost of the conversion kit, which can be expensive. Finding a good deal on a used bike can help you save money and ensure that you stay within your budget.
By following these tips, you’ll be able to narrow down your search and find a secondhand bike that is suitable for your DIY electric bike project.
Inspecting a secondhand bike
When you want to buy a secondhand bike to turn it into an e-bike, it’s important to check it carefully to make sure it’s in good condition. You don’t want to waste your money on a bike that won’t work or that is unsafe.
Additionally if the bike you’re going to see is a high-end bike being being sold for “too good a price” then there’s a possibility that it’s been stolen.
A good way of checking this is to get the seller to give you the serial number of the bike and check this against a bike register.
These registers or databases are made up of stolen bikes reported by their owners. A popular register in the UK is Bike Register. The equivalent covering the USA is Bike Index
A worldwide list of bike registers is available on Wikipedia
The Frame and Forks
The first thing you need to examine is the frame and forks.
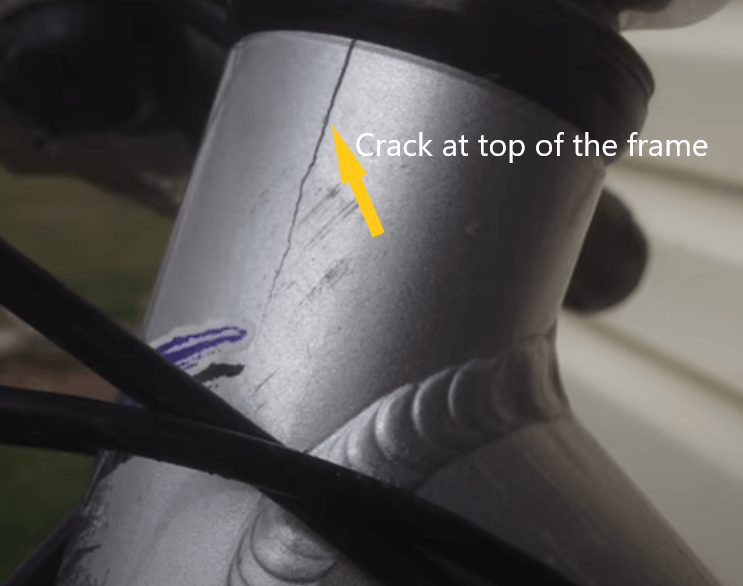
First things to look for are dents especially on the forks and any signs of cracks or bubbling paintwork. If any of these are present it can indicate corrosion.
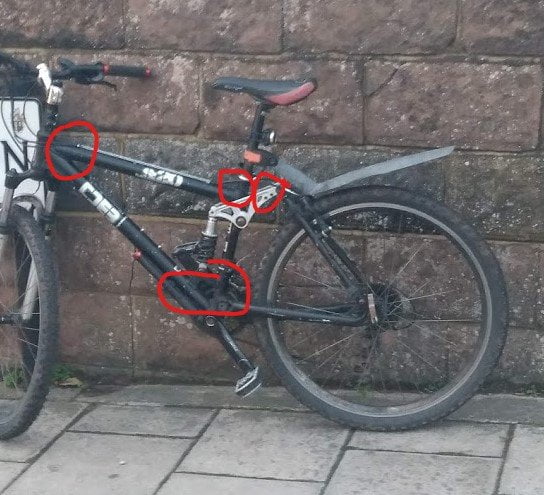
Look along each tube and pay special attention around the welds or joints where different parts of the frame join together – along the seat-tube where it meets the top tube; where the head tube and top tube meet; the bottom tube and seat tube intersection as circled in red in the picture. Any cracks in those areas – walk away.
Headset
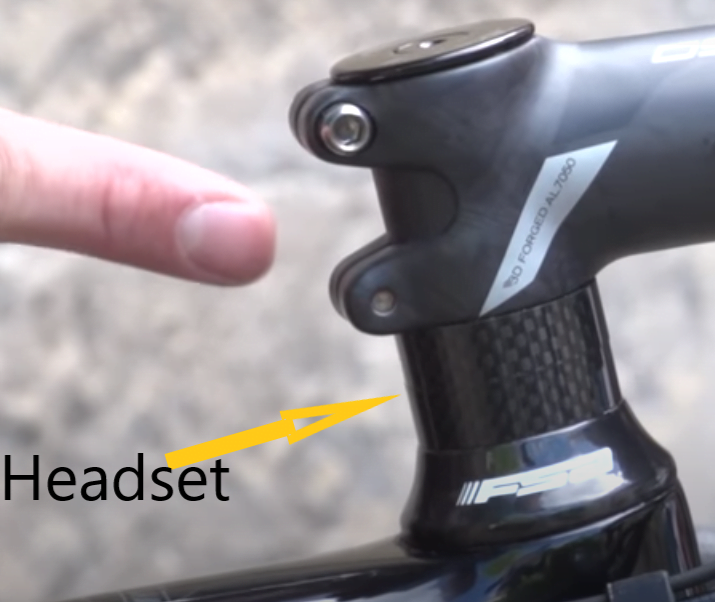
The next area to check is the headset. This sits between the top of the frame and the handlebars. The headset is important because it allows you to steer the bike. Most headsets consist of bearings that allow the fork and handlebars to turn smoothly while minimizing stress on the rest of your bike.
To check that the headset is working properly, pull the front brake and rock the bike back and forth. Putting your other hand on top of the headset or around it, while pulling the brake, can make it easier to feel what’s happening.
The headset should remain tight and show no sign of movement. If you notice any play, or a knocking noise then either the headset needs tightening – a simple fix – or it’s likely that the headset bearings need replacing. This can be very labor intensive, which is OK if you’re prepared to do the work yourself but costs dollars if you get your local bike shop to fix it.
If you’re still interested in the bike be aware that the previous owner hasn’t been maintaining the bike properly and you now need to proceed with your checks with even more caution.
Wheels
You want the wheels to spin straight and true. To check the front wheel, raise the bike on to the back wheel and spin the front wheel. Do the same thing with the rear wheel. In both cases watch for any wobbling from side to side.
If this is obvious and exaggerated, be prepared to walk away.
A new wheel can set you back around $100. If it’s very mild ie it’s out by a couple of millimeters it can be easily trued later on.
Spokes
If the wheels are straight and true you can proceed to a more ‘in-depth’ inspection.
Check that the spokes aren’t loose. Stretch your hand across three spokes and pull gently. You should hear a slight ringing sound if they’re tight enough.
If the spokes are too loose this can cause the wheel to lose it’s shape.
Rims
Check the rim of the wheel’s braking surface by running your finger alongside it. It should be consistently flat. If you feel it concave it means the rim is nearly worn out from years of rim braking.
Tires
Grab the tire and move the wheel side to side ie across the forks.If there’s any play or knocking sounds the wheel bearings have worn out.
Again….new wheel time
Of course if you’re looking at a secondhand bike to do a wheel hub motor conversion job on it, then you only need to make sure one of the wheels is in good condition.
Drivetrain
The drivetrain is the system of gears and chains that allow the bike to move forward. Here’s what you should check:
Chain
One of the cheaper parts to replace on most bikes is the chain. However, if the chain is badly worn, it’s likely that the chain ring and cassettes are also worn which cost significantly more to replace.
One of the easiest tests for wear is to try and pull the chain from the teeth of the front chainring.
If it barely moves, then the chain’s good. If there’s a big enough gap between the teeth of the chainring and the chain where you can see daylight in between, then the chain definitely needs changing. See video for demonstration
Then you need to check for uneven teeth on the chainring and the rear cogs. Worn teeth will cause the chain to jump erratically when changing gears.
Derailleurs
Check the front (if present) and rear derailleurs for proper operation. The derailleurs are the mechanisms that move the chain from one gear to another.
Make sure the derailleurs are working smoothly by changing through the gears.
If they are slow to change to the next gear it could simply be a problem with worn or rusty gear cables. These are cheap and easy to replace. It could also mean that the gears need to be indexed – this costs nothing but time to resolve.
If the derailleurs are not working properly, it may cause damage to the chain, cassette or freewheel, which can be expensive to repair or replace
If the derailleur is bent then this could mean it needs replacing which could be expensive.
Cassette / Freewheel
Check the cassette or freewheel for wear: The cassette or freewheel is the set of cogs on the rear wheel. Check that the teeth on the cogs are not worn down too much.
If they are, the chain won’t be able to grip the teeth properly, which can lead to the chain slipping or the gears skipping.
This can cause a loss of power and control, and potentially lead to accidents or injury.
Chainring
The chainring is the gear cog attached near the pedals.
Check that the teeth are not worn down too much. Worn down teeth means the chain may have difficulty engaging with the teeth, causing skipping and slipping while riding.
This can also lead to the chain slipping off the chainring altogether, potentially causing accidents or damage to the bike.
In addition, excessively worn chainring teeth can accelerate the wear and tear on the chain and other drivetrain components, leading to a shorter lifespan for these parts.
Cranks
The final check of the drivetrain is testing the cranks as demonstrated in the video below.
Can you move the bottom of the crank arms away from the bike?
Any lateral play indicates a potential problem with the bottom bracket. This can be a labor intensive and expensive job to resolve.
Brakes
Disc Brakes
Feel the brake levers for firmness. If the brake lever has to be pulled right up to the handlebars before biting then either the cables need adjusting or the braking system needs bleeding $30-$40 at bike shop.
Check disc brake rotors are flat. Spin the wheel and listen or look for rubbing.
Rim Brakes
Squeeze the brake calipers with your hands. You’re checking for freedom of movement towards the wheel and them springing back instantly. Any stiffness could mean they need replacing.
Brake pads themselves are relatively inexpensive as are brake cables.
Negotiating the Purchase
When you find a secondhand bike that you like and you’ve inspected it to make sure it’s in good condition, it’s time to negotiate the purchase. Here are some tips to help you get a good deal:
Do your research on the bike's value
Before you start negotiating, do some research to find out how much the bike is worth.
You can look at online marketplaces to see what similar bikes are selling for, or you can use a bike valuation tool to get an estimate of the bike’s value.
This will give you an idea of what to expect when it comes to price.
There are several bike valuation tools available online that can help you determine the value of a used bike.
Some popular ones include BicycleBlueBook, The Pros Closet, and eBay’s completed listings search. These tools use various data points, such as the make and model of the bike, its age, and its condition, to give an estimate of its value.
Keep in mind that these tools provide an estimate only, and the actual value of a bike can vary based on a variety of factors such as location, demand and seasonal fluctuations.
Point out any issues found during inspection
If you found any issues during your inspection, such as worn brake pads or a rusty chain etc, be sure to point them out to the seller. This will give you some leverage in the negotiation and may help you get a lower price.
Don't be afraid to make an offer
When it comes to negotiating, it’s important to be confident and assertive. Don’t be afraid to make an offer that’s lower than the asking price, especially if you’ve found some issues during your inspection.
The worst that can happen is that the seller says no, and you can always make another offer.
Keep in mind the cost of any necessary repairs or upgrades
Finally, keep in mind the cost of any necessary repairs or upgrades. If the bike needs a lot of work, it may not be worth paying the asking price. You can use this information to help you negotiate a better deal.
Remember, negotiating can be a bit intimidating, but with a little practice and preparation, you can get a great deal on a secondhand bike for your e-bike conversion project
Summary
In conclusion, converting a secondhand bike into an eBike is a great way to save money and recycle materials while getting a fun and practical mode of transportation. However, to ensure that the bike is safe and suitable for conversion, it’s important to take the time to inspect it before purchasing.
When looking for a secondhand bike, you can check online marketplaces, local bike shops, garage sales, and flea markets. Once you’ve found a potential candidate, you can use the tips we’ve discussed to choose the right bike, including considering your needs, frame material, geometry, size, and budget.
When inspecting the bike, you should pay special attention to the frame, wheels and tires, brakes, drivetrain, and suspension (if applicable). Don’t hesitate to ask for help from a knowledgeable friend or bike mechanic if you’re not confident in your ability to do it yourself.
Finally, when negotiating the purchase, remember to do your research on the bike’s value, point out any issues found during the inspection, make a reasonable offer, and keep in mind the cost of any necessary repairs or upgrades.
With all these steps taken into consideration, you can successfully find and convert a secondhand bike into a reliable and enjoyable eBike that fits your needs and budget.
So why not give it a try and join the growing community of DIY eBike enthusiasts?